Processing an order
In the order details you will find the tabs "Cutting plans" and "List of production".
At the top of the app view you will find important data about the opened job in the overview:
- Ordername
- Number of parts
- Number of needed boards
- Status
Choosing a cutting pattern
Under the "Cutting plans" tab, the patterns to be processed are displayed graphically.
Board information is displayed for each plan. If the board type has been registered in materialManager, the decor is also displayed.

All cutting patterns at a glance.
You can narrow down the displayed pattern via filters, for example according to the material used and according to the processing status.
If you manage your inventory with the materialAssist Boards, cutting patterns of a board type are marked with a warning triangle (1) as soon as there are not enough boards for this production order in the inventory.
The available such as the necessary number of boards is shown in the brackets behind the board code.
The brackets next to the board code indicate the available such as the required number of boards (2).

Warning if there are not enough boards.
To start processing, select a pattern. Here you can deviate from the order suggested by intelliDivide Cutting.
Selection of a board / offcut
First you select which board or offcut you want to use for the cutting pattern. The available boards or offcuts are displayed with their respective storage locations and the available quantity (1).
If you want to use a board which is not registered in materialAssist, select the option "Material not booked" (2).
Afterwards you can either "Start part cutting" (3) or "Start strip cutting" (4). When a board or offcut has been selected, the material is booked as removed in materialAssist after starting the cutting process.

Selection of a board/offcut from the materialAssist boards before starting strip or part cutting.
Cutting the strips
Especially for complex cutting patterns that contain many parts, it is often easier to start by cutting the strips first.

Start strip cutting after selecting the board.
productionAssist Cutting guides you through the necessary steps. The dimensions (1) relevant for the strips and the necessary trims (2) are displayed. The first strip is selected automatically. If you want to start with another strip, you can adjust the selection simply by clicking on a different one.
 and trims (2).")
Guided cutting of strips supported by the display of dimensions (1) and trims (2).
After cutting, a label for the strip can be printed out by clicking on "Label & Confirm". This allows you to clearly recognize the strip later. All necessary information, especially the name of the strip (#A, #B, ...), is included. Via the printed unique QR code, you can call up the cutting pattern belonging to the strip in the cutting pattern overview with a Bluetooth scanner or the tablet camera.
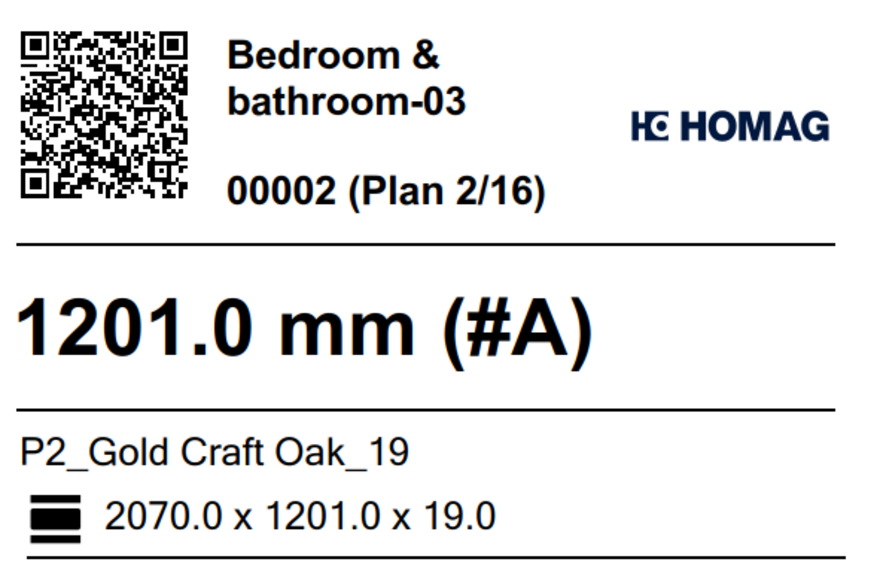
Label of a strip with name ( #A), material and dimensions.
Strips that have already been cut are displayed in gray.
 / light blue: active strip (2)/ gray: already cut strip (3)")
Straight display - dark blue: still to be processed (1) / light blue: active strip (2)/ gray: already cut strip (3)
You can also proceed without printing a label. To do this, simply click on "Confirm". This variant is recommended for striking strips or even the last strip, which can be easily identified again without a label.

Confirmation of a strip cut without printing a label.
After all strips have been cut, you can start cutting the parts.
Note: You can start cutting parts directly at any time if, for example, the plan is very simple or contains only a few strips and components.

Start cutting parts after cutting the strips.
For each part, the name of the strip is displayed in the detailed view.

Display of strip information for each part.
In the cutting plans overview, it is possible to navigate directly to the associated cutting pattern by scanning the QR code on a strip label with the tablet or a Bluetooth scanner. The first part of the scanned strip is marked.

Direct navigation to a cutting pattern through a scan of the strip label.
Direct navigation to a cutting pattern through a scan of the strip label.
Cutting the parts
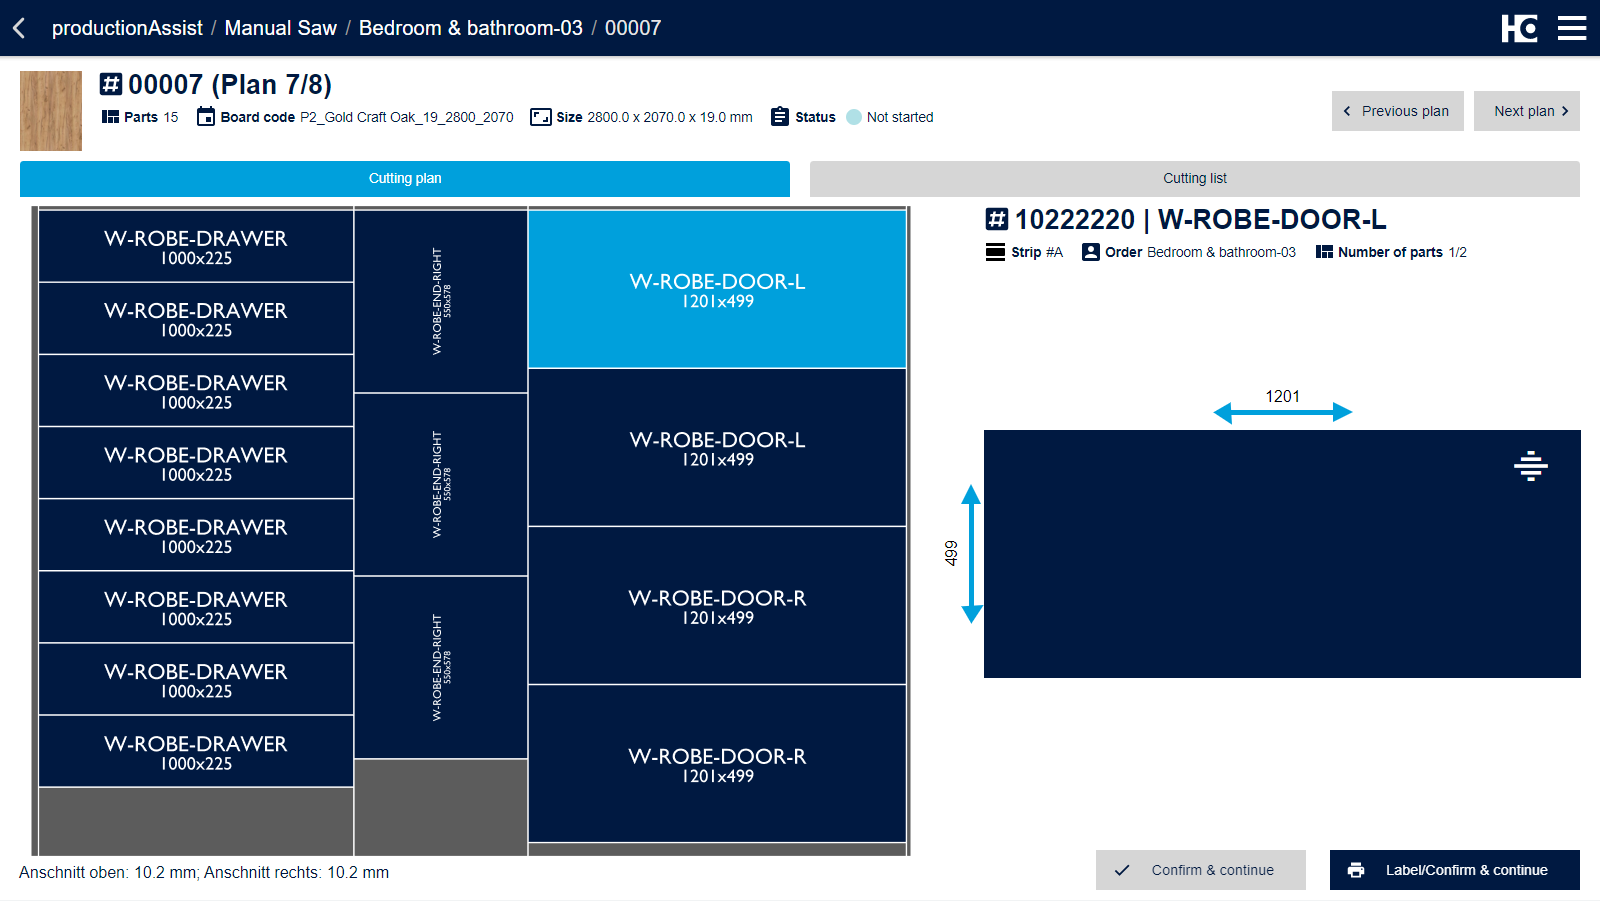
At the top of the cutting pattern view you will find the most important data for editing in the overview:
- Board name
- Board size
- Saw blade cutting width
- Processing status

Interactive cutting plan
The parts in the cutting pattern are marked in different colors:
- Gray: Parts that have already been sawn
- Light blue: Part that the app suggests as the next part to be sawn
- Dark blue: All parts that still need to be sawn
- Dark gray: Offcuts that cannot be used
The individual cutting patterns are interactive. Automatically, the next part to be sawn is highlighted in light blue on the cutting pattern. If you want to cut another part next, you can simply select it by clicking on it and thus change the order. Generally, the currently selected part is shown on the right side of the view – including the most important information. If you click on the part again, you will get more detailed information.
If you have cut a part to size, simply confirm this step by clicking on the Label / Confirm & Next button.

Label with the most important information about the component
This will automatically print the label for the component you just produced and mark the next component to be produced in the cutting plan.
Alternatively, by clicking the "Confirm & Continue" button, you can confirm the completion of the selected part without printing a label.

Interactive cutting plan
After cutting the last component in the plan, the next plan will be automatically displayed after confirmation. If all plans have been cut, the system automatically switches to the order overview to continue with the selection of the next order.
As an alternative to the plan view, a cutting list is also available.

Cutting list
In this, the labels can be printed for all components at once and the completion can be confirmed.